By
Aaron Zagrodnick in TrailGroove Blog
0
As one of the most important decisions you can make when it comes to backpacking gear, your choice of a backpacking tent can have quite the impact in regards to your comfort in camp and protection from the elements. Additionally, choosing the best backpacking tent can also have an impact when it comes to weight carried on the trail (as one of, if not the heaviest items in your pack), and a tent decision can have quite the impact on your wallet, as well.
With many factors to consider, in this article we’ll look at the top backpacking tents currently on the market, with a preference towards tents that of course offer protection from the elements, but also are lightweight and include plenty of space for the weight (including headroom), while remaining sufficiently durable and easy to use. Additionally preference here leans towards tents that haven’t had any flame or fire retardant chemicals applied, and for tents that are easy to get in and out of and have space to store gear.
Best Solo & Ultralight Backpacking Tents
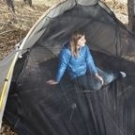
For solo use I look to save just about as much weight as possible and space is less of a concern – I find a little extra space to be much more useful and important when there’s more than one person sharing a tent. If it’s just me and in this day and age, I’ll look to go with a Dyneema Composite Fabric tent every time and will look for an ultralight tent under the 20 ounce mark or so. Previously my choice has been the (discontinued) Zpacks Hexamid Twin, which while designed for two was much more workable for one person having only a single side door and one vestibule. This tent however still only weighed around a pound.
An ultralight Dyneema Composite Fabric tent from Zpacks
Luckily there are modern-day alternatives available from Zpacks via their Plex Solo tent ($599, 14.5 oz.) as well as their Altaplex Solo tent ($699, 16.5 oz.), with the Altaplex being designed for taller hikers. I like a rectangular, non-tapering floorplan whenever I can get it no matter what tent I’m looking at, and as such the Altaplex would be an intriguing ultralight option. That said for those using standard-width pads who want the lightest pack, the Plex Solo and the Plex Solo Lite tent (a Plex Solo tent option featuring more ultralight materials and further weight savings) are equally interesting choices.
With the solo tent category one door and one vestibule work great, as can be found in the tent designs discussed above. However, especially for those that backpack with a wide pad and like space, the Duplex Lite tent ($699, 14.9 oz.) should be given strong consideration. The Duplex Lite is also an option for 2 with standard-width pads, who want to save as much weight as possible and don’t mind bumping elbows.
Regardless of which Zpacks tent you go with, I’d suggest at least considering their .75 oz. canopy material over the default .55 oz. Dyneema. I’ve used the .55 oz. material for years without issue – it’s not a bad default material and my tents have withstood years of use and severe weather. However, future DCF tents that I purchase will likely be of the .75 oz. variety just for all-around insurance.
The .75 oz. material will be stronger and offer greater puncture resistance, which may be appreciated over the long haul and when you need it, without too much of a weight penalty. As you might have guessed, Zpacks offering buyers the choice of this fabric option is one reason their tents are recommended so highly in this article. Note that as you might expect, their "Lite" tents are not offered in this heavier duty fabric, but are still worth consideration as the lightest of the light.
However, if you’re not sold on Dyneema and prefer a more traditionally-designed tent, one that does stand out in this category can be found in the NEMO Hornet Elite Osmo 1-Person tent ($600, 29 oz.). With 39” of headroom this tent may not be the most ideal choice for the tallest of users, but this height is on par with other tents in the more traditional, double-walled and freestanding (or semi-freestanding) tent market. At less than 2 pounds this tent will not weigh you down and can even fit a rectangular large and wide sleeping pad. If you’re looking to save some cash, NEMO also offers a standard version of the Hornet Osmo, which still comes in at a respectable weight with slightly smaller interior dimensions.
Summary: Best Solo & Ultralight Tents
Zpacks Plex Solo Standard
Zpacks Altaplex Classic
Zpacks Plex Solo Lite
Zpacks Duplex Lite
NEMO Hornet Osmo Elite
NEMO Hornet Osmo Standard
In summary if you’re looking for a Dyneema Composite Fabric (DCF) ultralight or solo tent and are open to a non-traditional design, Zpacks offers an excellent choice of floorplans and overall performance, and with the option of a heavier-duty DCF fabric for durability. For a more traditional design but still in the ultralight category, take a look at the NEMO Osmo series.
Best 2-Person Backpacking Tents
For a 2-person backpacking tent, I look for 2 doors with side entries and 2 matching vestibules, without question. This allows each person their own entry and exit (no having to crawl over anyone) and their own space to store gear at night. Generally, around 3lbs. or less is a good target here. For many years my go-to option here was the Six Moon Designs Lunar Duo ($395, 45 oz.). This tent features all the prerequisites above, but the weight of their lighter backpacking model (previously known as the Explorer model, and suggested if budget allows over their heavier Lunar Duo Outfitter) has crept up a bit in recent years.
The Six Moon Designs Lunar Duo 2-person backpacking tent
That said, the Lunar Duo backpacking model is not exactly heavy by any means and is a wonderful design with a 54x90” floorplan. This is one of the best floor measurements for a 2-person tent I’ve ever used. It’s long enough for tall hikers, wide enough for 2 wide pads, and isn’t excessive even with 2 standard pads…extra space is always nice. Additionally, the 45” centered height is great for sitting up in the tent. If at least one hiker uses a shorter pad, you can easily fit 2 people plus a dog or very small child in this tent as well, with gear being stored in the large vestibules. Find our Lunar Duo review here.
About the only downside to this tent is that, as with all silnylon / silpoly tents including those to follow from Tarptent, you’ll need to seal the seams with something like SeamGrip SIL seam sealer at home before you head out, although many manufacturers are now offering this as an add-on service. Many backpackers – including myself – have long hoped that Six Moon Designs would come out with a Dyneema Lunar Duo to take things from lightweight to ultralight...we’ll continue to keep our hopes up.
With its 90" long floor, the Lunar Duo from Six Moon Designs can fit 2 people with extra room, especially if at least one person utilizes a shorter sleeping pad.
For something lighter but significantly more expensive, the Zpacks Duplex tent ($749, 17.9 oz.) or the larger Zpacks Triplex Pro tent ($899, 22 oz.) are worth significant consideration. Zpacks tents are made from Dyneema Composite Fabric to save weight and you’ll end up with a tent that won’t sag in the rain like you can get with silnylon. At a 45” floor width, the Duplex will be tight for 2 people and both hikers will have to use standard-width sleeping pads, unless you want to absolutely max out the width of the floor with 1 wide and 1 regular-width sleeping pad…something I don’t recommend. The Triplex Pro however, at a 65” floor width could work for up to 3, but also has plenty of room for 2 people with wide pads and room for gear for those who like plenty of space.
Utilizing standard-width sleeping pads with the Triplex Pro can get you a 2+ person tent with room for a child or a dog for example, however for my use case the original Triplex (with a 60x90" floorplan – our Triplex review) was more versatile as a 2+ tent and offered more room for taller users. For a 2+ person tent that will fit wide pads, the LightHeart Gear Duo Tent ($340, 36 oz.) with its unique 55x100" floorplan is also worth a look and the longer floor makes fitting a dog in much easier.
The Zpacks Triplex offers room for 2 people using wide sleeping pads with room to spare.
Mainstream manufacturer Big Agnes makes some interesting tents in their Platinum and Carbon lines that are either freestanding or semi-freestanding, however there are some compromises to be had related to interior space or entry configuration (a side door, even when solo, is preferred). For example the Tiger Wall 2 Platinum tent ($700, 39 oz.) will get you a semi-freestanding tent for 2 using standard-width pads, but the 86” length and 39” peak height combined with a lengthwise sloping ceiling would be cramped for taller users.
In this category the Lunar Duo would be the closest tent to being a perfect fit for 2. That said, we’re not making a custom tent here and beggars can’t be choosers. For two using wide pads who also have a dog along, the aforementioned LightHeart Duo would be a better fit with the Zpacks Triplex Pro working for niche situations for 2 with standard-length wide pads who like room and gear (or maybe a dog) in the tent. These tents feature 2 doors and 2 vestibules.
Summary: Best 2-Person Backpacking Tents
Six Moon Designs Lunar Duo
Six Moon Designs Lunar Duo Outfitter
Zpacks Duplex
Zpacks Triplex Pro
LightHeart Gear Duo
Big Agnes Tiger Wall 2 Platinum
To summarize, the Zpacks Duplex would be more of an ultralight option for 2 with standard pads, while the LightHeart Duo or Zpacks Triplex Pro allows for maximum comfort / room for a dog or gear. The venerable Six Moon Designs Lunar Duo series offers a budget-friendly option with a perfect floor size for two. For a more traditional design, the Big Agnes Platinum tent is worth consideration.
Best Family or Group Backpacking Tents
There is not much discussion to be had here when it comes to the best group and family backpacking tent, as unfortunately it seems manufacturers pour most of their research and development into their 1 or 2-person tent designs. The Tarptent Hogback ($549, 63.2 oz.) is my choice in this category with few competitors. The Hogback is a 4-person tent that weighs in around 4 pounds and features an 86x86” floorplan that can fit up to 4 standard-width pads, or 3 wide pads, and features double-wall construction with either mesh or partial-solid fabric inner options. 4 people in the Hogback will be a squeeze and you’ll be fighting for vestibule space, but we’ve used it for 3 plus a dog on many occasions.
Tarptent Hogback 4-person backpacking tent
Although for years Tarptent declined to entertain the idea of making Dyneema Composite Fabric tents, in recent years they began to utilize this weight-saving non-stretch fabric, but it hasn’t made it up the line to the Hogback quite yet (which would save quite a bit of weight in a tent this large). That said, we’ve been quite happy with the silnylon fly utilized in our Hogback and about 4lbs is still quite light for a tent of this size. You can read our full Tarptent Hogback review here.
Although more of a backpacking shelter than a tent due to its floorless nature, the Black Diamond Mega Light tent ($500, 45 oz.) is also worth considering in this category and these tents and tents of a similar design have been successfully used by educational expeditions for many years. Depending on where you’re backpacking however, the extra bug and weather protection you get with an integrated floor like you’ll find on the Hogback may be appreciated.
There is an optional nest available for the Mega Light; however it more than doubles the weight and almost doubles the price. For a lighter option Hyperlite Mountain Gear offers their UltaMid 4 pyramid ($1440 as a tent, 62 oz. with the floored mesh insert and pole). With either of these shelters you'll need to be aware of some compromises pyramid shelters can have – like a pole in the center of the tent, slanted walls, typically one (relatively) small door for entry and exit, lack of vestibule space, and the possibility of rain getting into the tent when entering and exiting due to the slanted walls.
For freestanding options, the Copper Spur UL4 tent ($850, 88 oz.), with its larger (listed) 86x96” floorplan can fit 4 people with a couple of those people using wide pads, and this tent also has an impressive 50” inside height. In our testing getting this tent's floorplan to measure up to specs would be quite a stretch; thus we cannot recommend this tent maxed out with 3X wide pads along with 1 standard-width pad. That said the tent will fit 4 people all in the same tent, although you’ll be well over 5lbs. And if the UL4 still isn’t enough space, you can take a look at the 86x108” Copper Spur HV UL5 ($950, 117 oz.) which, as you might expect, is designed for groups of 5 and features 60” – or 5 feet, of headroom.
The Copper Spur UL line is typically a leader on the spec sheets – just be aware that to achieve light weight in a traditional design Big Agnes uses very light 15 and 20D fabrics that are lower on the hydrostatic head scale and feature a PU (polyurethane) coating. Coatings are very waterproof and allow manufacturers to tape seams, but coatings wear off, unlike impregnated silicone or Dyneema waterproof fabrics (it would be suggested to use a groundsheet – I use one made of window insulation film).
The recently updated and aforementioned Zpacks Triplex Pro with its 65x84” floorplan would work for 3 average sized people with standard length / regular width pads who aren’t too tall – and is about as light as you could get for this use case, but may be a bit short for taller users.
At some point and once the group size gets larger, taking multiple smaller separate tents may make the most sense and can even save weight over a single larger tent – although depending on your tent choice, this can potentially be more expensive.
Summary: Best Family or Group Backpacking Tents
Tarptent Hogback
Black Diamond Mega Light
HMG UltaMid 4
Big Agnes Copper Spur UL4
Big Agnes Copper Spur HV UL5
Zpacks Triplex Pro
For family and group tents the Tarptent Hogback is our choice, if your group will fit. The struts allow for good use of the 86x86” floorplan, but 86x86” is tight as group size approaches 4. The Black Diamond Mega Light and HMG UltaMid4 are pyramid options, which again are great if you fit and if you can deal with the drawbacks of the pyramid design, including inefficient use of floorspace. For more traditional designs, the Copper Spur series should be considered, however care will need to be exercised with the ultralight fabrics utilized. For 3 looking for the lightest possible solution, look no further than the Zpacks Triplex Pro.
Best Budget Backpacking Tents
Budget is relative, but for this category we can go ahead and rule out ultralight Dyneema tents and set our focus on the much more affordable nylon and polyester options. The Six Moon Designs Lunar Solo ($260, 26 oz.) can be had for less with free shipping and a sign-up discount, and if you catch it on sale it can even go for under $200. The Lunar Solo is roomy for one, fitting either standard or wide pads. The REI Co-op Half Dome Series of tents with a 2-person as well as a 3-person option has also been a go-to choice for many years.
The REI Co-op Flash Series of tents offer lighter weight options, and can typically be found on sale at intervals throughout the year. The venerable Six Moon Designs Lunar Duo can also be found in their heavier but much cheaper polyester Outfitter Tent version, which will get you a palace for 2 people in a package under 4lbs. for around $200. If you’re looking to save and aren’t too picky on an exact model, checking the REI Co-op Outlet from time to time can lead to some good savings on a variety of tent models from various manufacturers.
Summary: Best Budget Backpacking Tents
Six Moon Designs Lunar Solo
REI Co-op Half Dome Series
REI Co-op Flash Series
Lunar Duo Outfitter
REI Co-op Outlet Tents
If you’re looking to save some cash but still want a great tent, the SMD Lunar Solo is a venerable choice in this category for solo use. For two, look to the Lunar Duo Outfitter also from Six Moon Designs. The REI Co-op Half Dome series make for a traditional choice, with the REI Co-op Flash series offering some weight savings, and it’s always worth browsing the REI Co-op Outlet to see what’s on sale.
Best 4-Season Backpacking Tents
All the tents listed here thus far are primarily targeted towards 3-season use, but if you’re wanting to extend your trips into winter where heavy snow load can be expected and freestanding features become more important, you’ll need to look into 4-season options. The Black Diamond Firstlight 2P ($550, 54 oz.) has been a popular option for solo and 2-person use for years – you can find our full review of the Firstlight 2P tent here. If you like the Firstlight but want a little more space for 2 people, look at the Black Diamond Firstlight 3P ($600, 64 oz.).
Tarptent Scarp 2 4-season tent
For my use, I like the Tarptent Scarp 2 ($400, 56 oz.), however the weight is getting up there with the crossing poles and you’ll need to set a couple snow anchors with this one. For more, take a look at our Tarptent Scarp 2 review. When it comes to 4-season tents and winter backpacking, you don't want to make any compromises in regards to protection from the elements or the sturdiness of your tent, and extra weight carried here is typically worth it.
Summary: Best 4-Season Backpacking Tents
Black Diamond Firstlight 2P
Black Diamond Firstlight 3P
Tarptent Scarp 2
For winter and 4-season usage the Scarp 2 from Tarptent is my choice, be it a solo or 2-person trip. However and as you might expect, Black Diamond has plenty of choices in this category that are among the most popular 4-season tents of all time.
Final Thoughts
Overall when selecting the best backpacking tent you need to find a balance between weather and bug protection, weight, space, and price – and getting that balance just right will be a little different for each of us. However, with hundreds of options on the market the perfect tent is likely out there for everyone no matter your needs.
For more on baseline information and factors to consider when choosing a backpacking tent or shelter, see our guide on how to choose a backpacking tent that goes into tent design and factors to consider on a more overall and general level. For a list of additional backpacking tents to consider from various manufacturers that you can narrow down by capacity, season, and more, check out this page at REI.com.